
How to Make Beats Step-By-Step
Get the FREE Beat Making Cheat Sheets from the Video
and Never Struggle With Making Melodies, Chords or Drums EVER AGAIN!
What you’ll get with our game-changing cheat sheets pack:
- Easy access note, scale and chord diagrams to make writing melodies a breeze
- Drum groove patterns in a variety of genres for quick, pro-sounding rhythm sections
- Easy-to-remember chord and scale hacks that will instantly step your musical game up
- Pro level chord progression cheat sheet to help you add industry-level harmony to your beats
Download Your Free Copy Today!
What Others Say About the Free Cheat Sheets
“It saved me a lot of time and my beats sounded a lot better. Your tips are the best and you are a genius as you did something like this. I cannot imagine how frustrated and depressed I would have been without your emails.”
Rinad M.
FULL VIDEO TRANSCRIPT
How to Make Beats for Beginners
Welcome to full Beat Making Academy guide on how to make beats!
I’m gonna show you how to make your own beats step-by-step using FL Studio, even if you don’t know anything about making music.
And if you don’t want to use FL Studio to make your beats, the concepts we go over in this video apply to every beat making software out there.
We’re going to go over how FL Studio works, all the different sections you need to know about, the different steps to making a beat – like adding chords, melodies, drums, bass and more – and how you can take the different loops you make and turn them into a fully arranged beat that’s not boring or repetitive.
How to Use This Beat Making Guide

The best way to follow along with this video is to download the free trial of FL Studio if you don’t already have it. This way you can follow along step-by-step and make your very first beat within the next hour while you go through this tutorial.
Just open up a web browser and search Google for “FL Studio” – click on the first link right here where it says “Download” and you can get a free trial for either Windows or Mac.
If you’re serious about beat making you should purchase the full software – it starts at about $99 for the basic FL Studio and that should be enough for you when you first start out.
Once you’ve got it installed on your computer just double click on the icon to open up FL Studio and let’s get right into it.
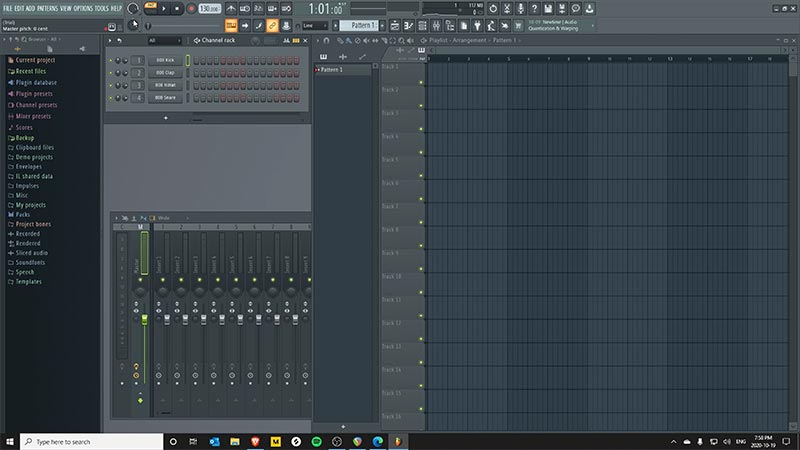
When you first open up FL Studio it’s going to show you a demo project that comes pre-loaded with the software, instead of showing you a blank canvas.
Just go to the file menu and choose “New” and it’ll now look like this.
Part 1 – The Basics of Beat Making
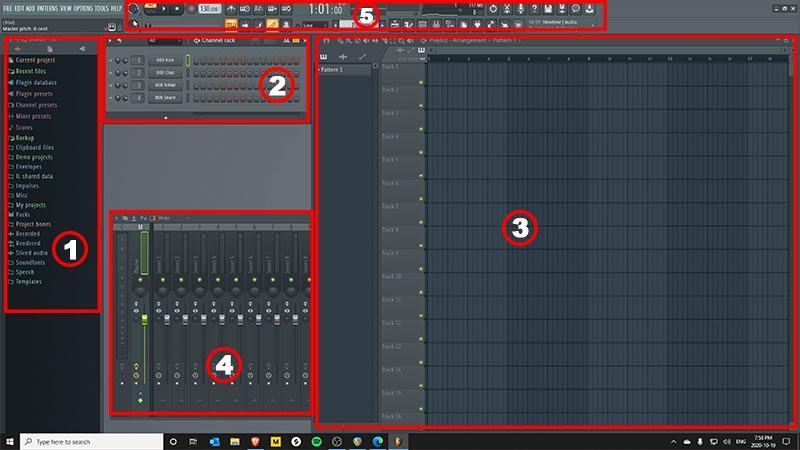
Now, there’s a few basic sections that you need to know about within the software, so let’s go over each one starting on the left of the screen.
The Different Sections of FL Studio Explained
This section is called the BROWSER window (1) and it’s where you search for the different sounds you’re going to use in your beats – whether that’s a piano, a drum sound, a guitar, a synth or whatever – you’ll find it here.
You just click through the different folders and choose whatever you want to use. You’d drag the instrument or sound file you choose from here into this section beside it called the CHANNEL RACK or STEP SEQUENCER (2). This is the place where you basically draw in the different notes and beats you want that sound to play.
So for example if I wanted the kick drum to play on these different beats, I’d draw them in by clicking on the squares with my mouse. If I want to remove a note/beat, I just right-click on it. This is best for drum and percussion sounds.
If you’ve got a melodic instrument like a piano, you right-click on that instrument name and choose PIANO ROLL (not pictured). This brings up a piano sequencer where you can draw in actual notes at different pitches up and down the length of the piano.
You can turn the volume up or down of the sound/instrument or move it between the left and right speakers using these knobs here. If you want to mute the sound so it doesn’t play back, you’d click this green light.
The next area you should know about is called the PLAYLIST or ARRANGEMENT WINDOW (3). This is where you take the different patterns/loops you create in the channel rack and lay them out in different places across a timeline, so you aren’t stuck with a repetitive 4 or 8 loop that just plays over and over again without changing. Now if you don’t understand what I mean by “4 bars” or “8 bars” – it’s how you count time in music. I’ll come back to that in a second.
So in the playlist, you can bring in different loops/patterns and take out different loops/patterns in various places by drawing them in or dragging them over.
This makes things change up and stay fresh across your entire beat so that your idea starts to shape into a full song instead of a boring, repetitive loop. That’s called “arrangement” in music and it’s a more intermediate topic that you’ll keep learning about.
The next section you have to worry about is called the MIXER section (4). This is where you take all the different sounds in your beat and adjust the volume (which is obviously how loud the sound plays back relative to other sounds) and panning (whether the sound comes from the center or more from the left or right speakers). Right here is also where you can add different effects to your sounds like reverbs, echos, distortion and more to change up the tone, or help it sit better in the mix of all the sounds.
You adjust things here so that nothing is too loud or too soft, or isn’t sitting right with the other sounds. You use it to get everything sounding clear and clean. It’s a more advanced topic called mixing and mastering, but it’s good to know about the basics of it.
The last section I wanna go over right now is called the TRANSPORT CONTROL section (5) – which is right up here across the top of the window. As you can see there’s a play button and a stop button. This is where you start and stop the playback of the music you’re creating in all the other sections of the software.
If you have it set to PAT right here, it’s only going to play the current pattern you’re working on, looping over and over again. You choose different patterns right here where it says “Pattern 1” – you just click the up or down arrows to select a different pattern. You can have as many as you want.
If you go back here and choose SONG instead of PAT mode, it’s gonna play the full arrangement that you’ve got drawn out in the playlist window – with all the different patterns playing together.
This 140 right here is the TEMPO of your beat – or how fast/slow you want your beat to play back. It’s measured in BPM or beats per minute. You can set it to whatever you want, but I’m gonna use 160 for the beat we’re gonna make in this video.
This button right here is the METRONOME, which is a helpful “click track” that will playback a click or tick on every beat. This helps you out a lot when you’re playing and recording notes from a MIDI keyboard or drum pad, instead of clicking the notes in like we’re going to do in this video.
This is important to know – you DON’T NEED any crazy equipment or midi keyboards and drum pads and all that shit to make dope beats. But they do come in handy.
For this tutorial, all you need is a computer/laptop and a demo of FL Studio.
Anyways, if I press play while the metronome is enabled, you’re going to hear a click on every single beat – it’s basically counting out the time for you so you can stay on beat when playing the notes (this has to do with “bars” mentioned above)
To use a keyboard or drum pad to play the notes in live, hit the RECORD button right here. It’s a good idea to use this “Count In” button, so that when you hit record, you hear 1 bar of clicks playing before the actual recording starts, so you can get yourself ready.
There’s obviously more to the software than that, but now that you know the basics of what everything does, let’s jump into making the actual beat from scratch.
What’s Involved in the Beat Making Process?
Here’s how it basically all works:
- You’re gonna choose a bunch of different sounds (whether it’s drums, pianos, synths, something else)
- And you’re gonna create separate patterns using each sound (so you’ll have a kick drum pattern, a snare pattern, a piano pattern, a bass pattern, etc. – whatever kind of pattern you want)
- And you’re gonna take those different patterns and combine them in different ways (for example, all patterns playing at once, taking out some sounds, adding in different sounds, etc) and have them playback until your beat is a few minutes long and sounds like a “full song.”
- Then you use the mixer to make sure everything’s volume is leveled nicely, and each sound is clean and clear and nothing is over-powering or clipping and distorting in a bad way.
- And then you have a pro sounding beat you can send to artists, upload to spotify or record your own vocals on.
OK, let’s get it…
Step 1: Choose a Sound + Make Your First Music Pattern
I’m gonna start with some melodic stuff in this video, but you don’t have to. You can start a beat with whatever you want – drums, bass, chords, whatever.
So I’m on Pattern 1 in the pattern selector and I’ve got my tempo set to 160. And I’m going to go to the browser window and choose my first plugin to create my chord pattern with.
FL Studio comes with a bunch of built in sounds and instruments for you to mess around with, but most of them (especially the drums) are pretty wack.
They’ll work for now, though so let’s go to the plugin database and click on GENERATORS – this is all the different synths and stuff included in FL Studio.
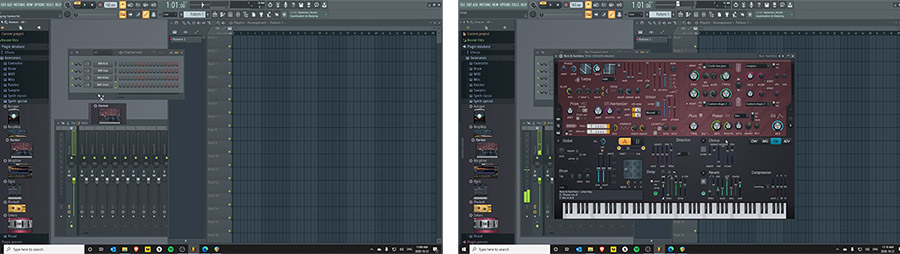
The first thing Ima choose is the HARMOR synthesizer by dragging it from the browser into the channel rack right here.
Now if I hit the keys at the bottom of the synth you’re gonna hear the default sound that’s loaded in it.
What I’m gonna do is go over here to presets and choose a different sound that sounds good to me. So let’s go to keys and choose something and see what it sounds like.
Sound selection is super important when making beats, you wanna only choose really dope sounding shit.
Ok this sounds alright, let’s use it. I’m just gonna close out of the synth window by hitting the X on it.
And then I’m gonna right-click the Harmless synth in the channel rack and choose piano roll so I can draw in different notes at different pitches.
And now we can start laying down a melody.
I’m just gonna choose different notes by drawing them in here and come up with a pattern I think sounds good.
NOW IF YOU’RE NEW TO MUSIC and don’t know how to pick notes that sound good together, or how to come up with chords/melodies and you don’t wanna waste time guessing with trial-and-error, there’s a set of CHEAT SHEETS that come with the BeatMakingAcademy Tool Kit that makes building chords, melodies and drums SUPER STUPID SIMPLE.
The full BMA Toolkit sound pack costs about $35, but you can download the cheat sheets for absolutely free using the sign-up form on this page right below this section and you can download these super helpful cheat sheets absolutely free.
What you’re gonna get is a bunch of different quick-reference cheat sheets that show you exactly which notes you can play together so you can easily come up with dope sounding chords and melodies while following the rules of good music – even if you have ZERO music theory knowledge.
So make sure you download these cheat sheets. They’re gonna help you a TON.
Get the FREE Beat Making Cheat Sheets from the Video
and Never Struggle With Making Melodies, Chords or Drums EVER AGAIN!
What you’ll get with our game-changing cheat sheets pack:
- Easy access note, scale and chord diagrams to make writing melodies a breeze
- Drum groove patterns in a variety of genres for quick, pro-sounding rhythm sections
- Easy-to-remember chord and scale hacks that will instantly step your musical game up
- Pro level chord progression cheat sheet to help you add industry-level harmony to your beats
Download Your Free Copy Today!
Choosing a Key to Make Our Beat In
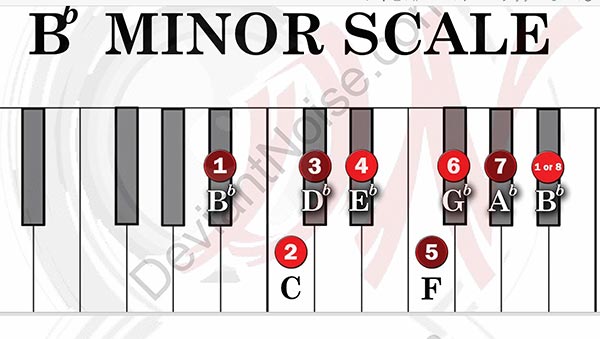
So, in this beat, I’m gonna use the Bb Minor scale because I like the way it sounds. So you can see on this sheet it shows me that I can use the notes Bb, C, Db, Eb, F, Gb, Ab, and Bb to create my melodies.
You can basically just experiment with these notes and whatever you come up with will always sound good and fit together, without a bunch of guess-work.
Like I said, to download these cheat sheets for free just fill in the form above and get access to 24 different scale sheets plus a book full of hacks to help you quickly build chords, chord progressions and drum grooves easily.
They’re super helpful, especially when you’re starting out.
Starting Out With a Melody
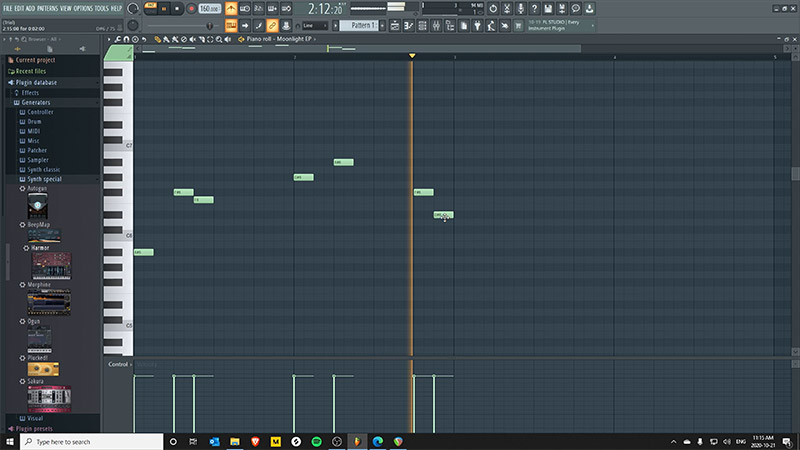
So let’s make a quick melody in the Bb Minor Scale. I’m just gonna choose a few notes by drawing them in to the piano roll and dragging them around while playing back the audio, until I get something I like.
OK so I’ve chosen a few notes for a simple melody, let’s listen to it by hitting the play button.
So you can see all the notes I used are the same notes from the piano cheat sheet I used. But I’m not really feelin the sound anymore, so I’m gonna click on the synth in the channel rack to bring it up and choose a different preset I like better.
I’m gonna let the pattern play on loop while choosing sounds until I get what I like.
OK, so we’ll go with that for now.
Now I’m gonna stretch out the channel rack by dragging the bottom corner of it. That’s because by default it only shows you 1 bar, and the melody I created is more than 1 bar long
So now that I’ve got a little melody started, if you want; pause the video, go into FL Studio, choose an instrument and a sound preset you like and create your own little 4 bar melody.
To make it easier for yourself right now, just stick to using ONLY the white notes on the piano.
Once you’re done watching this tutorial, you can download the cheat sheets and start using ALL the notes on the keyboard.
When you come back to this video, we’ll start adding more sounds to our beat.
Step 2: Make More Music Patterns to Create a “Super Loop”
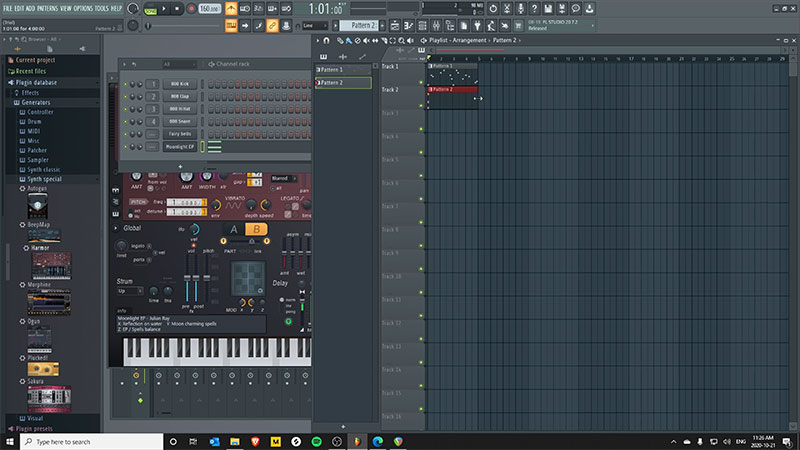
What I’m gonna do now is add this melody pattern to the playlist window because I want to build more sounds on other patterns and have them all play back together.
So I’m gonna choose SONG in the transport control then I’m gonna draw the pattern into the playlist. Now when I hit play, it should play the entire playlist, instead of the pattern alone.
Next, I’m gonna come up to the pattern controller here and move it to pattern 2.
Now I can create a new pattern to add more sounds.
How to Make Chords for Our Beat
This time I’ll try adding some chords to build up the overall harmony of this beat. Let’s go back to the cheat sheets and figure out how to build up a Bb Minor chord. Now you can see the notes are either a lighter red or a darker red.
The darker red notes can be used together to create the root chord of that scale. So in this case I can use the notes 1, 3 5 and 7 notes – the dark red notes – together to form the chord.
If I only use 1-3-5 I get the basic Bb Minor triad chord, and if I add the 7th note it becomes the Bb Minor 7 chord.
So let’s add that chord.
First I’m gonna choose a separate sound to make the chords. I’ll keep using the same HARMOR synth, but you can choose a different one if you’d like
So I’ll drag it into the channel rack below my last instrument and click on it so it pops open, and I’ll choose a preset that I like again…
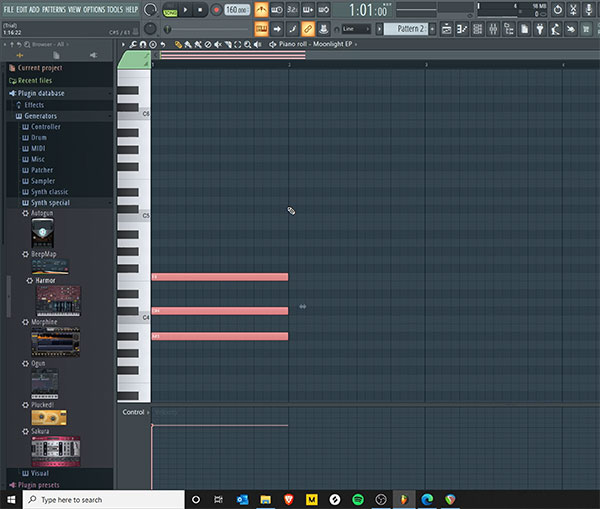
Now I’m gonna right click on the second harmless synth and open up the piano roll
And this time I’m going to draw in the Bb Minor chord using those 1-3-5 notes – the Bb, the Db and the F
I want them to be lower in pitch, so I’m gonna scroll down on the piano roll and draw the notes in right here.
You’ll notice that the same set of 12 notes (7 white keys, and the set of 2 and set of 3 black keys) repeat on the piano roll over and over.
They’re the same notes, just higher or lower in pitch.
If I hit play now, we won’t hear it play because I haven’t drawn this new pattern into the playlist. So I’ll just come over to the playlist and this time I’ll drag in pattern 2 from the left side here, right underneath where I drew in pattern 1.
I have to stretch it out a bit so it matches the length of pattern 1.
Now I’m gonna hit play so the melody plays while I’m building the chords back in the piano roll here.
I want the chord to ring out, so I can select these notes by hitting CTRL (CMD on Mac) and clicking and dragging the mouse over top of them.
Then let go of CTRL and you can drag out the length of the notes. And this is how that sounds…
Now I wanna add a second chord in there, but I’m not sure what to use.
So let’s take a look at the melody we wrote, and see what other chord might sound good. You can go back to that first pattern by selecting it with the PATTERN SELECTOR up here, of by double clicking the pattern in the playlist window.
If we look at our scale cheat sheet we see that note that starts the second half of the melody is the 7 note.
So let’s try building a chord using that note. Now, I know a quick hack to build a chord using any note thanks to another page in the free set of cheat sheets I’m using.
You basically place down the first note (i.e. the note you’re trying to build the chord on) and then I can skip 3 steps in the piano roll, place another note, skip 2 more steps in the piano roll and place the last note. That’ll give me the major chord of whatever note I’m starting with. If I wanted to build the minor chord, I’d basically do the opposite (first skip 2 steps, then skip 3 steps).
How do I know I want a MINOR chord vs. a MAJOR chord? In the cheat sheets it shows you exactly which chord sounds best with the chords you’ve already created.
So since I’m using the 7 note from our scale to start the next chord, I come to this cheat sheet and see that that chord should be a MAJOR chord.
There’s a bunch more hacks in these cheat sheets that let you easily build other chords and even how to build entire pro sounding chord progressions (which are patterns of chords all the pro’s use to create beautiful melodies and harmonies) quickly.
Again you can download them using the sign-up form on this page.
I can add more chords if I want by using the same method, but I’ll leave it like this for now. So you should pause this video again, go back into FL Studio and lay down a couple of chords using a different sound. When you come back, we’ll add some more stuff to this beat.
How to Add Drums to Our Beat
Alright, the next thing we’re gonna do is add some drums.
The drums are usually my favorite part of making beats because it’s where things really start to come together. I don’t usually start off a beat with drums, but you can if you want. There’s no right or wrong way to how you make your music.
If you look in the channel rack, you see FL Studio pre-loads a kick, clap, hat and snare. These are all different sounds on a typical drum set (except the clap), and are included in FL Studio, along with a bunch of other drum sounds, but they mostly sound like complete ass.
I don’t really like using stock sounds and plugins, but you can still make some heat with that stuff if you use it right.
Right now, I’m gonna use some of the drum sounds that come with the Beat Making Academy Toolkit I mentioned earlier in the video.
These drum sounds are some of my favorites and I’m always using them, but they’re not available for free unfortunately. You’d have to buy the full pack to get them. It’s definitely worth the money because you get 160 different drum sounds that slap, but for now you can use the sounds that come with FL.
I’ve already added the BMA toolkit to my FL Studio browser. To do that you just click the little arrow in the top left of the browser and choose “configure extra folders.” Then you locate where the sounds you want to add are on your computer and you’re good to go.
I’m just gonna click on toolkit folder in the browser, go to the drums folder and choose a few sounds I think will sound good with this beat.
We’ll start with the kick drum. It usually hits on “down beats” (1 and 3) to help give the groove a solid foundation we can nod our heads to.
I just have to click on the individual sound file to preview how it sounds. And when I find one I like, I just drag it over to the channel rack.
I can drag it below our synths, or I can drag it on top of the pre-loaded kick sound to replace it with the one I chose.
I like my drums to be loud, so I’m going to click on the kick in the channel rack to bring up the “sound properties” and choose ‘Normalize” to make it louder. I’m also gonna turn up the volume knob.
Next, let’s choose a snare, clap or snap sound. The snare usually hits on the “up-beats” (2 and 4), to help anchor the overall groove.
Let’s use this one and just drag it over top of the pre-loaded snare. I’m gonna turn it up as well.
Now that I’ve got a kick and snare sound, I can start building out the groove.
Let’s switch to pattern 3 and start making the Kick drum pattern.
Rather than put all the drum sounds on the same pattern, I want separate patterns for each sound. That way I have a lot more control over what plays when, and how loud everything is overall.
Before we do that, there’s something you have to understand about time.
I just said the kick is usually on 1 and 3 and the snap is on 2 and 4. That’s technically true, but because my tempo is 160, that’s gonna make it play back REALLY fast and it’s gonna sound corny.
See?
It would sound a lot better if I my tempo was only 80 BPM. But sometimes I like to work in double time. That’s why I chose 160.
What that means is that although my tempo is 160 beats per minute, I’m actually making a beat that FEELS like it’s only 80 beats per minute.
If you’re making a lot of trap-influenced music, you’ll probably be working in double time a lot. That’s how you get those crazy rapid-fire hi-hat rolls you hear in every song on the planet for the last 5 years.
So instead of putting the clap/snap/snare on 2 and 4, we’re gonna put them on the 3 and 7 beat. That way it SOUNDS like it’s on the 2 and 4 while in double time.
Watch…
Now that I have the snare/snap/clap down, I’m gonna move onto the next pattern and experiment with where I want to place my kick drums.
Let’s draw it in the playlist and stretch it out before we start.
Cool, so now we got a kick and snare pattern.
I still don’t think the drums are loud enough, but instead of turning them up in volume, I’m just gonna turn down the other instruments a bit.
That’s better.
Next up let’s choose a hi-hat. A hi-hat is a cymbal on a drum set that helps keep time steady in the groove.
Let’s drag this in and switch to another pattern in the pattern selector. Make sure you’re always drawing each new pattern you make into the playlist window so it plays back.
Hi-Hats usually plays more often and faster than the kick and snare. A really easy way to add a hi-hat pattern is to just right click on the sound and choose “Fill Each 2 Steps” and it’ll automatically draw the note in the channel rack so you don’t have to click in each one.
Press play, and you’ll hear a pretty basic full drum groove.

Obviously this is a super basic drum pattern, but it can get pretty bouncy and complex if you work at it.
If you’re completely stuck on how to put together a full drum pattern, there’s another set of pages in the free cheat sheets pack you downloaded that has drum groove templates you can copy exactly.
There are basic groove templates and even advanced templates based on the groove’s of some of the biggest legends in the game!
Again, you download ALL of these cheat sheets absolutely free using the sign-up form on this page. You’ll get all of scale, chord and drum cheat sheets instantly in your email inbox to use right away.
What I’m gonna do really quickly is send the hi-hat to the piano roll and add some more hits in various places to get things bouncing a bit more.
So here’s our beat so far… I’m just gonna turn off the click track because we don’t really need it anymore.
So now, you should pause the video and go back into your FL Studio project and add a basic drum groove using a few different drum sounds.
You don’t have to stop at kick, snare and hat. Try adding some percussion hits randomly to see how it sounds.
When you’re back, we’ll add another element to our beat.
How to Write a Bass Line For the Beat
Alright, so now we’ve got a solid little loop going, but it needs some low end energy. So we’re gonna add a bass line to this.
We have a couple of options, we can add a synth bass or an 808. If you’re not familiar, an 808 is a type of drum machine from back in the day. But now it’s mostly used to refer to those loud boomy bass lines you hear in a lot of trap-influenced music.
We’ll start with a synth bass, then try an 808 as well.
But before I do that, I want to change things up a bit with our patterns because it’s only a 4 bar loop and is sounding a bit repetitive to me.
Here’s what I’ll do, let’s open up our chord pattern by double clicking it in the playlist and copy/paste it so it doubles in size.
All I have to do is select all the notes using my mouse while holding CTRL (or CMD) on the keyboard. Then I let go of CTRL and hold down SHIFT while dragging the selected notes.
Now that I’ve doubled the pattern, I can change up the end of it by messing around with the notes like this to add some variation.
But since I doubled the size of this pattern, I have to go back to the playlist and do a couple things.
First I have to drag out more of this chord pattern so it doesn’t get cut off half way through. Then I need to copy the other patterns that are only half the size over to fill out the empty space below the rest of the chord pattern in the arrangement.
I do that the same way by selecting the patterns and holding SHIFT while dragging them to copy them over.
Here’s what the beat sounds like now. OK Let’s get to the bass line.
Let’s drag another synth into the channel rack and find a bass sound.
Now switch over to the next pattern and we can start drawing in the notes like we did with everything else.
If you’re unsure of what notes to use in a bass line, you can’t go wrong by mostly sticking to the 1 and 5 note of whatever scale you’re working in.
You can find that out using the cheat sheets.
Another easy way to build a bass line is to just use the root note (i.e. the bottom note or 1 note) from your chords.
So we can quickly do that by going to the chords pattern we created, selecting all the bottom notes, hitting CTRL-C (or CMD-C) on the keyboard to copy the notes, going back to the bass/808 pattern and hitting CTRL-V (or CMD-V) to paste the copied notes in.
Now if we play the beat back, here’s what we’ve got. Easy peasy.
How to Use 808s In Our Beat
If we wanted to make an 808 bass line, it’s a similar process.
Unfortunately FL Studio doesn’t come with any 808 sounds. But the full Beat Making Academy Toolkit sure as hell does. It comes with 16 different 808 sounds, so we’re just gonna use one of them for now.
Let’s browse through the 808 folder to find one we like. We’ll use this one right here, so let’s drag it into the channel rack on top of the bass synth we originally selected. Let’s press play and hear how it sounds.
Cool, so that’s a very basic bass line without much bounce to it. What if we want something more complex and bouncy?
We could just experiment with different notes and note lengths until we come up with something we like.
But since I’ve got the full BMA Toolkit loaded up already, let me show you something dope.
The Beauty and Simplicity of MIDI Patterns for Beat Making
There are these things called MIDI patterns, which are pre-created music patterns that you can drag and drop into your project super quickly. You can also totally customize them however you want.
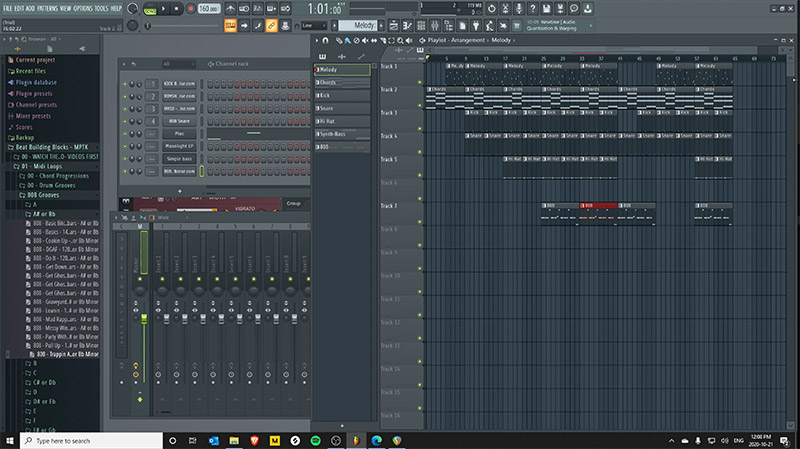
So let’s browse to the MIDI Loops section of the BMA Toolkit, go into 808 Grooves and find something we like. Since I’m working in the Bb Minor I’m gonna click on B Flat folder and find something that will work with my beat.
All the patterns are categorized by scale and tempo, so you can find stuff quickly that’ll match your beat perfectly, no matter what notes you’ve been using in your beat.
So this one right here, looks like it’ll work because it’s a similar tempo and the correct key we’re in.
So I’ll just drag it over top of the 808 channel in the channel rack and it automatically replaces the pattern in the piano roll.
Let’s play it and see how it sounds
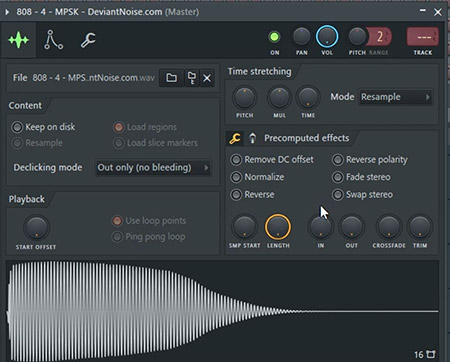
Sounds a bit weird, right? The tricky thing about using 808s is you don’t want the hits to overlap each other – it makes it sound muddy and jumbled.
So we need to change the way the 808 sound hits. Just click on the 808 channel in the channel rack to bring up the sound properties and we can make a bunch of different adjustments to the sound. Play around here on your own, but all we want to do right now is make each new hit of the 808 cut off the previous hit by check this box.
Now let’s play it and listen.
Sounds much better. Let’s try out a different MIDI pattern.
Cool, I like that, but if I didn’t I could just click here to enter the piano roll and customize the notes however I want. That’s the beauty of MIDI patterns.
The Beat Making Academy Toolkit comes with thousands of these MIDI patterns – you get stuff for drums, chord progressions and melodies in every key on the keyboard, and a bunch of other cool shit. It’s essentially an entire tool kit for music producers.
Like check this out, let’s try one of their trap hi-hat patterns since that’s kinda the vibe we got goin on right now.
I’ll just browse to that folder and pick something. Drag it over top of the hi-hat channel in the channel rack. And I’ll click in so you can see how all the little rolls look.
Let’s play this and see how it sounds. Dope… so we got a nice little 8 bar loop going right now.
So now you should pause this video and go add your own bass line to your beat. When you come back, we’ll talk about taking this loop and arranging it into something that sounds more like a full song.
Step 3: Arrange The Beat Loop Into a FULL Song Instrumental
Alright so let’s finish things off by arranging our loop. This won’t be a comprehensive guide on how to arrange music, but I’ll give you a basic idea of what you need to do.
The thing you gotta remember is that in any song you have a bunch of different sections – you’ve got the intro, the verse, the chorus or hook section and the outro section… Some songs have pre-choruses and bridges and turnarounds, but we don’t really need to worry about those right now.
So what you’re trying to do is layout a full song, with all it’s sections using different combinations of the patterns in your main loop.
You want to keep things changing up in your beat, so you keep listeners interested and they don’t get bored with your song.
That doesn’t necessarily mean adding new sounds. It means being creative with how you build up and break down the energy in your track using the patterns in your loop.
You want to tell a story with your instrumental.
So, the first thing we’re gonna do is rename all our patterns so it makes it easier to see. Just right click on the pattern selector or the pattern name in the playlist and choose rename.
Now, we copy our entire loop over and over on the playlist timeline until we have about 3 or 3 and a half minutes of play time.
A quick way to do this is to select all the patterns in the playlist and hit CTRL-D (or CMD-D) a few times.
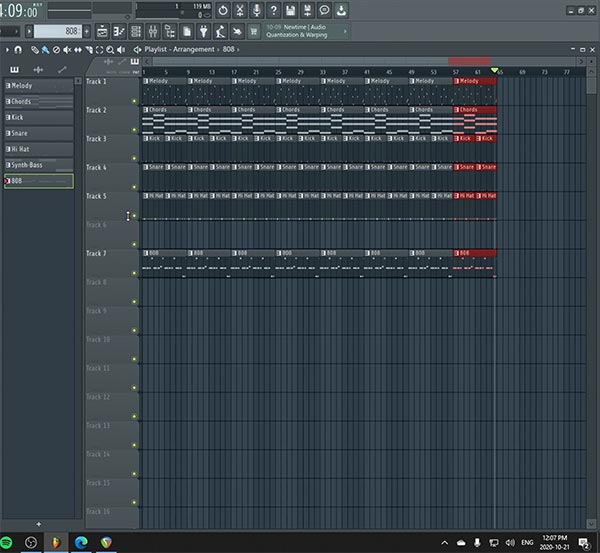
Next, we go back to the beginning and start shaping this big wall of patterns so it starts to resemble a real song.
We’ll start with a 4 bar intro, so I’ll get rid of everything but the chords and melody.
Next I want a 16 bar verse to drop, so I’ll leave the drums in for 8 bars, but no hi-hats. In the second 8 bars of the verse I’ll leave the hi-hat’s in as well.
Then the chorus is next, so that’s where everything will play together including the bass line.
Let’s see how that sounds.
Starting to sound like a real track, now right?
So you’d just finish that up with a second verse and chorus combination and then do an outro and you’ve got yourself an arrangement. It’s a basic one, but it works.
And that’s pretty much it – those are the basics of how you make beats using FL Studio 20. You should now be able to make your own beats from start to finish.
Step 4: Mix Your Beat to Get an “Industry Sound”
Next up, you’re going to want to mix your beat. We won’t go into it here, since it’s an advanced subject.
But feel free to mess around with the volume levels on the mixer to get things to sit better together. But we’re not gonna go into mixing your beats in this video.
For now you should just focus on picking dope sounds, coming up with dope loops and getting a fully finished beat arranged in the playlist.
And definitely make sure you download the free cheat sheets using the form below!
Get the FREE Beat Making Cheat Sheets from the Video
and Never Struggle With Making Melodies, Chords or Drums EVER AGAIN!
What you’ll get with our game-changing cheat sheets pack:
- Easy access note, scale and chord diagrams to make writing melodies a breeze
- Drum groove patterns in a variety of genres for quick, pro-sounding rhythm sections
- Easy-to-remember chord and scale hacks that will instantly step your musical game up
- Pro level chord progression cheat sheet to help you add industry-level harmony to your beats
Download Your Free Copy Today!
What Others Say About Our Beat Making Cheat Sheets
I downloaded all the sheets and tried them. They are great, and so easy to use. The way it explains the scales is the best I’ve seen so far. I’m sure it will be a gr8 help in the future! Thanx again!!!
Janos B. – Beginner Beat Maker
Those cheat sheets are going to help you out a ton. They make it dead simple to come up with chords, melodies bass lines and drum grooves without having to know any music theory or spend all your time guessing with trial-and-error. They’re 100% free, so take advantage.
They’re a life savor when making beats – especially if you’re brand new to beat making. It’ll save you a TON of time. You can start using them instantly for no cost at all and I’ll send you a bunch more beat making tips to help you step your game up the right way.
And with that boys and girls, that’s exactly how to make beats from scratch using FL Studio 20, step-by-step. If you found this guide helpful, please share it with others!